![[louispage]](louis2a.gif)
OK, another page, this time about XPlane... my latest flight simulator. Being an old-time (1973-1978) radio operator on offshore installations in the North Sea, having flown for hundreds of times with Sikorsky S61's, Bell twinjets or Bolkow 105's and Alouette-III's, of course I wanted to re-create that world in XPlane. Here are some tips how to do it, I'm probably not the only one...
Converting FS oilplatforms for Xplane
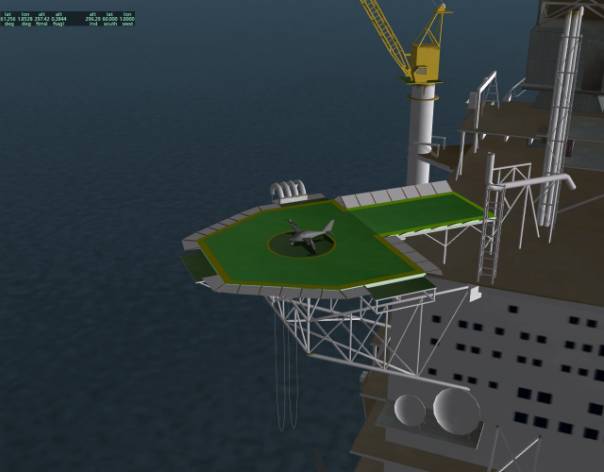
Austin Meyer’s converted private VTOL being used as helo, here on Statfjord-A, which in turn is a converted Hibernia… All the green helideck stuff (4 objects together) was hardened
Well, except for the things you can put around using the Overlay Editor…
There’s lotsa stuff around on the web for MSFS and FSX, of course! And we do have a scenery converter, don’t we? FS2Xplane does a pretty decent job, but there are a few flaws.
First get the files, which are for MSFS or FSX, usually zip archives. Then unpack them to “C:/program files/Microsoft games/Flight Simulator X/addon files/new directory” where “new directory” should be the directory for the package. This structure should be available under a decent Windoze system, so create a directory for the package. Let’s say we go converting the Ekofisk package, so create a directory Ekofisk inside the addon files directory. Unpack your zipfile into this one.
Now, next you have 2 options: either the unpacked stuff contains a structure with the necessary files already (older packages), or it has an executable which will install the stuff (almost all newer packages). In the 2nd case fire up the installer and let it install into the very same directory again. Usually it will create a directory substructure inside the directory.
Next is converting the whole bunch for use with Xplane. Fire up the FS2Xplane converter, for the 2 lines regarding sources, point it at the main directory into which you previously unpacked and installed, in our case “Ekofisk”. For the output you should create a similar directory inside “Xplane/Custom scenery” which you should call “Ekofisk” again for obvious reasons. Make sure the directory is empty, or FS2Xplane will refuse to do its job.
Next hit the button for which Xplane version you want to convert, hit “convert” and wait till “summary.txt” is displayed. Sometimes a lot of lines appear about “Missing flare effect at …..” Don’t worry, FS has a bunch of gimmicks Xplane doesn’t have but that’s not important here. Sometimes it complains about a specific file not been found. Don’t worry too much either, the stuff will be there anyway. This is because some packages use standard files available in FS and you haven’t got them, but usually they are of very little importance.
Next you can fire up Xplane and check out the bunch. The problem always is that the helidecks are “soft stuff”, which means you cannot land on them, you simply sink (drop) into the underlying sea. Even if the decks in FS are hardened, they won't be in XPlane. So much for oil platforms.
The reason is that the converter doesn’t mark certain stuff as “hard objects”, which at least helidecks should be.
So can’t we land there? Sure we can!
If you have the Overlay Editor (get it if you don’t have it, it’s free and a great tool!), load the scenery package into it and check out the stuff. Zoom into your platform and try to select the helideck itself. Sometimes you have to zoom in or out or rotate around the object to get it, but once you have it it will display in the viewing box and have the name of it highlighted. That’s the one! Make a note of that specific name and go into the “Custom scenery” directory, open the objects directory inside the specific scenery directory and search for the same filename as an .obj file. Open it in Notepad and scroll towards the end. There will be a line “ATTR_no_blend” around. You can do two things: change the line into “ATTR_hard” or add a line “ATTR_hard” beneath it, as long as it is on a new line. If there was an empty line under “ATTR_whatever” before, after you add a new line, there should still be an empty line under that one.
The structure should look like this:
IDX 0
ATTR_no_blend
ATTR_hard
TRIS 0 6
Note: there shows an empty line here between the two ATTR-lines, which shouldn't be there. Frontpage problem...
Next save the file in Notepad (don’t use “save as” as stoopid Notepad wants to save as .txt file which we don’t want. It should remain something like “helideck.obj”, at least the same name it had before you opened it in Notepad. That’s why you should use the menu option “save”.
Now fire up Xplane again and try to land again. Piece a cake, no? There you are in your Bell twin jet sitting on the deck of Ekofisk Hotel at 180 feet over the sea. One gimmick is that you can fly straight through the whole construction as long as you stay below 180ft with your rotors since all the stuff is “soft”, but don’t fly at 175ft or you’ll crash. Of course you can harden everything. Actually if you fly with your rotors into a crane sling dangling somewhere about, your blades will break up and you’ll crash in real life (and believe me, it happens… back in 1975 we flew with an S61 into a sling dangling over a helideck with the sun directly in front of us, so we didn’t notice it. It was a hard landing but a safe one). But hardening 25 to 50 individual objects on each platform is some job… and it eats frames! Hardening derricks, cranes, flarebooms etc. will add realism. Your choice!
Where is the stuff available? Avsim has a lot, but the site was hacked by idiots a while ago and although a lot has been recovered, not everything is there (yet). Another site is www.fs-odg.com, which has literally every platform in the North Sea as on June 2006 modelled. Including dozens of semisubs, jackups, supporting vessels etc. That’s the British part of the North Sea, everything in the Dutch, German, Norwegian and Danish parts is not there, except for a jack up rig on the Danish Dan Field. For the US freaks they modelled the Santa Barbara Channel and something more.
Here’s the second part of the trick. As long as you keep this for private use and don’t publish your packs, I think there can be no objection against it. Using existing packs, you can “rebuild” the platforms (or whatever) at other locations. The trick is how to position all individual parts correctly and usually this is done from a central position into a certain direction. Now this direction may vary on occasions and if it’s different and you place it into the wrong direction in the Overlay Editor your platform may end up showing weird.
Dismantle a platform piece by piece, checking how/into which direction an item should be placed, make notes and then copy the relevant contents into a new directory. Rebuild the structure as it should be and voilà!, you have a new platform. Sometimes names are put into .png files, which you can edit/rename with Paint. So “Ekofisk 2/4-H” can be edited into “Fake-1” if you want and your newly built platform will be “Fake-1” now. Since you cannot simply copy and paste in the Overlay Editor, certainly not between different tiles, it’s a painstaking job, but it can be done. I created a complete Dan Field using various stuff from other packages. The Dillon platform from an Alaska Oilfield bundle now sits somewhere in the German North Sea, together with a semisub and a laybarge from a Faroer Project, a support vessel from somewhere around the Shetlands and a Single Point Mooring Buoy from Kittiwake. All helidecks hardened, so I can hop around a whole day between them. Lots of work indeed, but lots of fun too. A lot of these things have NDB’s too, most of the info comes with the packages and while flying around you simply place them while you’re landed onto a deck. Hit the map, go into edit, add the NDB and fill in the details. The transmitter will be located at sealevel under your deck and is visible on a next trip, provided you answered the “save navaid file first?” question with “yes” upon quitting Xplane.
One more: the missing files, where “summary.txt” complains about. There is another way to deal with it, except for ignoring it. Install all the packages you want to convert first, which should be in ….Program Files/Microsoft Games/Flight Simulator X/addon scenery/… The next thing you do is convert one package and check the “summary.txt” file for missing stuff. This is always some .bmp file, which CAN be present in other packages. So look for it (by means of the find option in Windoze) in the original installed packages for FS (see directory above). Once found, copy the missing file(s) into the relevant base directory (one subdir called textures), empty the relevant Xplane Custom Scenery package directory again and convert again. If all goes well, there won’t be any more missing files. It means double work again but at least your stuff will be complete this time (and whether that’s visible in the end or not you simply have to accept).
Am I finished now? Nope, not yet. Sometimes structures show weird white cones, which should represent the lighting from floodlights. We know in Xplane this works amazingly well, but the conversion from FS goes wrong. Everything in the floodlightbeam is hidden by this white cone. We can do without it. Go into the Overlay Editor, try to isolate the beam and check if it is a beam only and not something important somewhere else too. If it is a single beam, remove it. At least now you can see what’s underneath it. Sometimes you can’t remove it without an attached vital part somewhere else being removed too, so be alert. Appearently, translucent stuff in FS is different from translucent stuff in Xplane.
Trick nr. somuch: getting an interesting object from one tile to another. Yessir, you can do it by simply rebuilding it. Yessir, some objects are pretty hard to rebuild, because they use 2 or maybe even more central settings and a lot of individual objects have different headings from these centers. You’ll spend a day dismantling a construction and another day rebuilding it somewhere else.
We have tools, remember? Like XPtools, stuff like Grinder etc. Go grinding!
Grinder can convert a .dsf file into a textfile, and the other way around. Take the dsf-file for the tile with the interesting construction to Grinder and next read the output-txt file.
You’ll notice the construction is there, first as a complete list of objects, next as a list of how/where they are placed. These objects are listed in the dsf file together, where construction nr-1 appears first, then construction nr-2 etc. Then the list of how they are placed, again construction nr-1 first, construction nr-2 next, etc. So what we need is the object list and construction-list taken out and worked into the dsf-file for the tile where we actually want the object. The only thing we should alter is the numbering for the objects, which goes from 0 to whatever number plus the degrees for latitude and/or longitude. Once this has been done and verified, put the textfile into Grinder again and Hey Presto!, we have a new dsf-file. From there you can select all the individual objects for your construction and drag them wherever in the tile you want them. Let’s say the original dsf-file listed objects nrs 0 till 153 inclusive. So your newly added ones should start with 154. Of course don't forget to copy all the relevant obj, png etc files to the new objects directory where your new scenery is located!
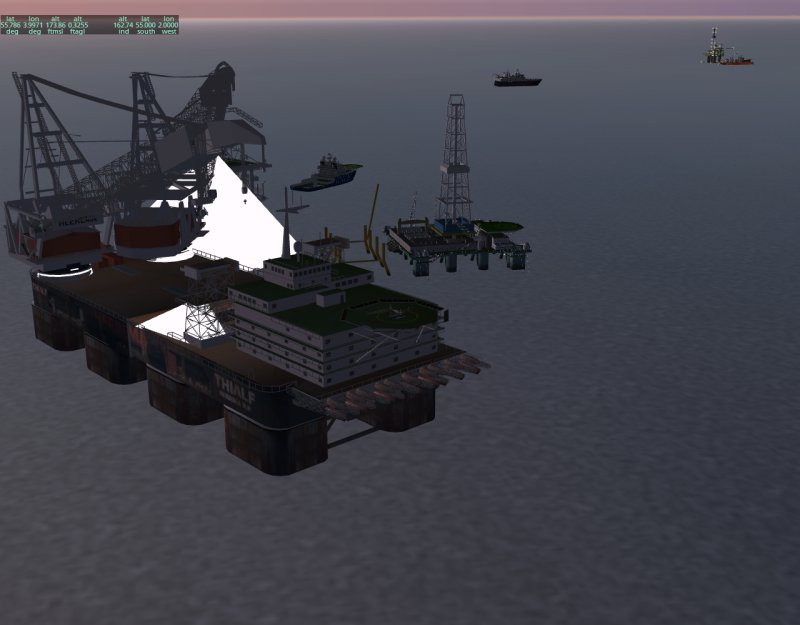
This way I pulled the derrick-barge Thialf from the Faroes Offshore scenery (60 something North, 5 something West) to my Chaparral scenery in the German part of the North Sea, which is 55 something North, 3 something East. Time to get there about 1 hour. I know the Thialf is self-propelled, but she’s not that fast!.
Thialf lifting a module onto an already placed jacket on GNSC A/6-2, with the semisub Atwood Falcon on the other side. Left behind the Falcon is GNSC-Explorer, further to the right the Geco Eagle, and top right the Baker on A/6-1 with the Cable-1 working on pipes. All decks landable! All constructions built up manually using existing stuff. The GNSC A/6 wells were drilled between 1974 and 1977, we found gas but it wasn't enough to produce. Since the rig doing the drilling was called Chaparral, I now call this gasfield Chaparral! The stoopid white cones on the Thialf cannot be removed without removing vital crane parts too, unless you start messing with the object files.
And another Fake One further south in the North Sea. Actually it's an adapted Hyde platform and renamed to A-9-1. Hyde is a very detailed satellite platform, helipad and nameplates are easy to edit in Paint.
You can also adjust for individual flaws in object files, like the Thialf helideck was sitting some 13 feet too low on the construction. The Thialfpad.obj file was quickly edited with new figures and now it matches the supporting construction and the net structure around it. I could have lowered the net structure but that would have been immensely more work.
One thing: don’t publish such stuff; keep it strictly for yourself. Thialf (and a lot more) is copyright Steve Chase, who died in 2009. I know he planned to model the Saipem-7000 and a lot more stuff, but unfortunately he never finished it.
Safe landings!
www.avsim.com download section (needs registration)
www.fs-odg.com download section (needs registration)
www.airwegogroup.com download section
Most complete packages (and the newest ones) are from the ODG-group. Ekofisk is available at Avsim, mail me if you can’t get it: louis@holleman.demon.nl
Avsim still has some older packages, like the British Amethyst and Ravenspurn fields, but these files have been redone and now look 100% better. Best get the complete packages at ODG.
Another howto: how to get a rigplatform to be operational as a departure airport? Well first it needs to be an airport. So, make a preliminary note of what the center position of the helipad is in the Overlay Editor. We need that for the next thing, which is to create an airport in WED. Make it a heliport and give it an identifier (ICAO) code. Oh boy, what code should I use? One which hasn't been used sofar. Like in Holland, you have ICAO codes ranging from EHAA to EHZZ. For the Chaparral I used EHOX, because that one wasn't being used and the X stands also for Experimental. The O could stand for Offshore, whatever you like. Btw, Xplane can also use codes like EH01 to EH99. So create a heliport and next give it a helicopter platform. Well sir, there is one already hardened and available... Yessir, but the heliport needs an official platform. In WED create a helipad centered on the exact same coordinates as the helipad in the Overlay Editor was centered. Make the pad just 100ft x 100ft. Big enough! You can adjust the heading to your liking and make the surface transparent! No markings, no lighting (lighting is usually available from the construction itself) and save the apt.dat in the subfolder "Earth nav dat" in the mainfolder in Custom Scenery which in the case of the Chaparral would be "Chaparral"... Pads in Xplane usually are square, but because of the small thing, the transparency of the thing plus the fact that we already have a platform, it won't be visible. Next you can choose "Chaparral" or the ICAO code in the departure list, click the H1 pad which is now available and hey presto!, you're not launched from sealevel but from the deck structure at somany feet above sealevel. That's also why the pad needs 100x100 ft at least. Make it 10x10ft and it won't hold your plane and once launched you will crash into the water.
Wowiezowie, we found another trick!
Lots of files in the object files, use a dds-file for the textures. Hmmmmppfff, how do you edit a dds file? Erm, replace it with a png file... What I use is Irfanview, a free program to view all kinds of graphic files. Irfanview loads dds files and you can see what it looks like. Next, save the file as a png file. When asked to define which color should be transparent, hit Escape to cancel the transparent color. The relevant object file should be edited so it will use the png file instead.
So for instance the line TEXTURE HZ25-1.dds
should become TEXTURE HZ25-1.pngHey Presto???? not yet... If the original dds file is still there, it seems that the object will still use that file. Next change the HZ25-1.dds file into notHZ25-1.dds. Hey Presto! The object cannot find its original file any longer and will use HZ25-1.png. The png file is usually easily edited in Paint (or any other decent program).
Some background info for the freaks:
GNSC stands for German North Sea Consortium. Back in 1974 it represented several German companies, with BEB (Brigitta & Elwerath, a German Shell-Esso subsidiary) as operator. They chartered the Zapata Offshore jackup Chaparral for 4 years to do a lot of exploration work. Amongst others we drilled A/6-1 (that's where the Baker sits) and A/6-2 (where Atwood Falcon is anchored). Both wells produced gas, but in the end they considered the find as "non-commercial".
In 2015 I learn that later on the reason for not producing the gas was the cost of a pipeline into Germany. There was a gasline from Ekofisk to Emden, running not too far to the east, but it probably lacked enough capacity to accomodate the german gas as well. When in the 80's the dutch constructed their trunkline, options became different. Now they could lay a pipe towards F3, where the dutch produced both oil and gas, so the germans started with production in 2000. How things can change... Nowadays Wintershall with a share of 49% is operator, while BEB is still a shareholder with 40%.
GNSC-Explorer never existed but here I created a non-existing gas field in production so who cares? We used to fly out of Schiphol Amsterdam and usually flew 2 to 2½ hours, since the site is 210nm North of Schiphol, usually with Sikorsky S61N's. One well was drilled some 15-20nm off the island of Juist near Emden and we flew an Alouette-III out of Emden airport. In those days Thialf didn't exist yet but again, who cares? The biggest stuff around then were Thor, Odin, ETPM-1601 or Sarita capable of hoisting 2,000 tons. I believe Thialf lifts 12,000 tons in dual crane configuration...
Credits: Don Elliot/Philippe Malenfant for the Baker model + conversion
Tor Inge Lima for the jacket construction
Steve Chase for a lot of models
Alun Heseltine for a lot of other models
Page revised 05.01.2016